All the things we are enjoying today have some ancient origins. People have been fermenting grapes into wine for thousands of years.
Similarly, the process of baking bread started hundreds of years ago.
Though these hand-made things vary slightly from the ancient method, the basic concept of making those hand-made things are the same.
The same statement is also true for making the violins.
The ancient violins were slightly different in shape, dimension, and design.
Violins of the 17th century were made with little bit longer necks and fingerboards. Before the 1800s the violins were made without chin rest.
But most of the methods, tools, and materials remain unchanged while making a violin of today.
Luthiers who crafted violins in the ancient period and the violins that are making today in a large manufacturing farm might not be the same.
But the basic concepts are still the same in the case of creating contemporary violin.
Here we have tried to illustrate a brief overview of how to make a violin.
List of Tools Needed for Manufacturing A Violin
- Planes: Block plane, Jack plane, Thumb plane
- Saws: Coping saw, Gyokucho saw
- Gouges: Long handle gouges, Narrow chisel, 1.5 mm mortice chisel, Scroll gouges
- Spool clamp
- Clamps: Lining clamp, Bass bar clamp, C clamp
- Measuring tools: Steel ruler, Vernier caliper, Dividers, Compass
- Thicknessing caliper
- Reamers and shapers: Peg hole reamer, Peg shaper
- Bending tools: Bending iron, Bending strap
Saws, gouges, chisels, planes, and clamps are the most common tools in a luthier’s kit box.
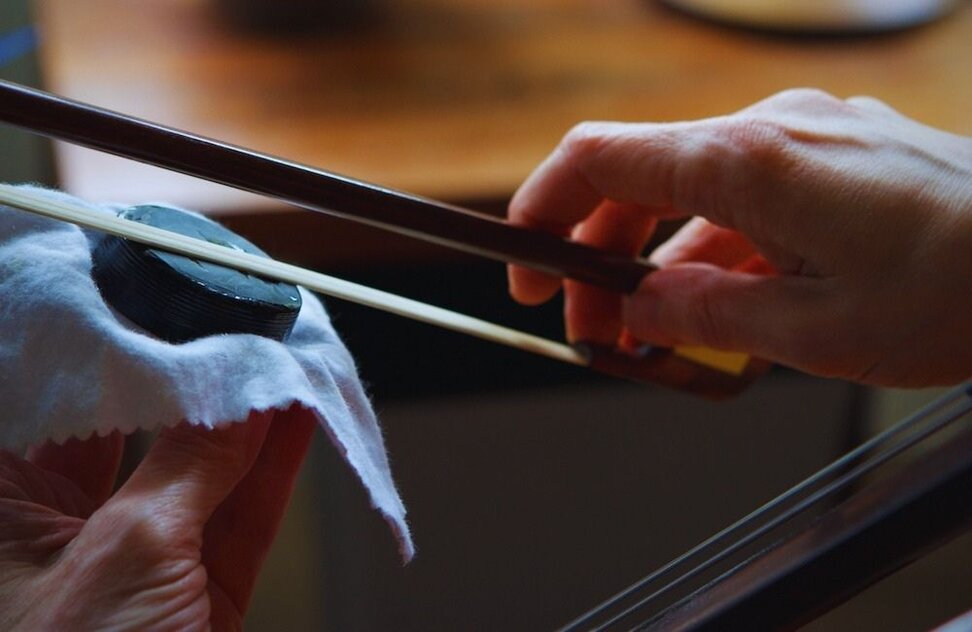
A bending iron and a purfling cutter are other essential tools for making violins and other string instruments.
Usually, hide glue is used to bond the pieces of violins together.
Woodworking and carving planes, chisels, gouges, knives, saws, and scrapers are also the required tools for making a violin.
In addition, few specialized tools like thickness caliper, small curved bottom “thumb” planes, purfling groove cutter, peg hole reamer and matching peg shaver, bending iron, various types, and patterns of clamps are important for crafting violin.
To produce good quality sound the perfect measurement is the most important.
Whether violins are made in a luthier workshop or a big manufacturer factory if the precise measurement cannot be maintained the sound quality of the violins will not be good.
Therefore, maintaining a precise measurement is an important skill to make a high-quality violin.

A comparative study between vintage violins and contemporary violins revealed that the consistent density of the different parts of the violins can play a major role to generate superior sound.
The vintage violins such as Stradivari and Guarneri violins can be able to produce high-quality music compared to modern violins due to the consistent density in separate pieces of a violin.
Surprisingly the craftsman of 500 years ago could meet such a level of precise measurement and created the best quality of violins.
Therefore, still, the manufacturers are trying to shave the wood carefully to get the desired thinness.
The perfect painstakingly cutting notches and grooves will help the violin makers to produce the best quality violins for players.
Some violin makers use their tools to make their own designed violin. These sharp edge tools help the violin makers to develop their skills.
How To Build A Violin Like Professionals
In the beginning you should prepare templates after selecting or creating a design for the violin.
These templates are made for the different pieces from plywood. Then the pieces of plywood need to be cut into strips.
These strips are used to form the ribs or the sides of the violin.
In this stage, use bending iron that can make the wood flexible.
When the ribs bent into the shape they are glued properly. This is the basic process to trace the outline of the top and bottom of a violin.
This structure is mainly constructed with spruce and maple wood.
This is just an oversimplified process of making a violin. The whole process of making violin is explained below:
Total Time 20 days
Preparing The Ribs

The first step of making a violin is to prepare the sides of the ribs.
Outline the top and back from these ribs or sides (wooden form with 15 to 18 mm thickness).
These are constructed on an inside mold and then cut to the exact outline of the inside of a violin.
The pieces of wood are cut to approximate size to make the corner and end blocks of the violins.
These are temporarily glued to the cutouts on the mold at appropriate locations of the violin.
The linings are bent to match the exact shape by using the bending iron and finally glued to the inside of the ribs. The corners are trimmed to get their final shape.
After that, the top and bottom surfaces of the ribs, linings, and blocks are filed to get the exact level at the final height.
Establishing The Top and Back

The tops of a violin are usually made from a wedge of wood. Almost always it is the edges of a split wood piece that are glued together. The joint needs to fit with absolute perfection.
The back of the violin also treated the same way to make a two-piece back.
However, a one-piece back is ideal for preparing a good quality violin.
To create a perfect center joint, you must use a planning process.
When the pieces are perfectly fit, they are glued together and clamped.
After gluing the center joint the violin makers place the ribs and establish the outline of the top or back.
These outlines are applied to cut out using a bow or coping saw.
However, you may use a powerband or scroll saw.
Developing The Body
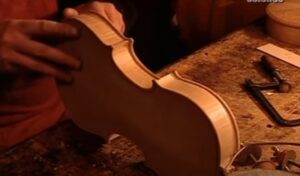
By loosening the temporary glues, the mold can be removed from the rib.
The top and back of the violin are then glued to the ribs.
In this case, thinner and weaker glue is used for the top while full-strength glue is required to hold the back of the violin.
This process is followed due to removing it easily in the future (if any service or adjustment is required).
It will allow the violin makers to open extreme level humidity and temperature rather than producing any cracks in the body of a violin.
Finally, the edge of the separate parts of the violin is rounded. For this purpose, violin makers use a knife, file, or sandpaper.
The surfaces should be finished with scrapers that ensure a crisp appearance as well as the best beauty of the wood.
Forming The Neck

In this stage, a piece of the block made of maple wood is squared on the sides and top with a plane.
Then the outline of the side view can be traced that may help to craft the outline of the outside.
The patterns for the pegbox, the top surface of the neck, and the scroll also can be traced in this time.
Now luthier uses a razor saw to cut away wood around the scroll and neck outlines.
Finally, the neck is set by using glue into the mortise.
The mortise and the root of the neck must be very precise for producing a high-quality violin.
Thus, the final shape and design of the neck and the back of the violin is done.
Fitting Up The Violin

Finally, the bridge and soundpost are attached to the violin body.
The perfect position and the precise fit of all the parts of a violin greatly affect the sound and playing qualities of the violin.
Numerous adjustments of the soundpost, the bridge, types of strings, and the other factors are usually required to optimize the best tonal characteristics and playability of a violin.
Varnishing of violins
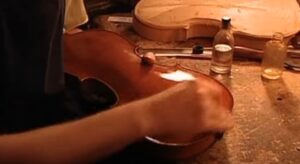
The varnishing of violins is another important factor that is associated with the extraordinary tonal characteristics.
It is thought that the old Italian violins could produce majestic harmony due to the excellent quality of varnishing of violins.
It is also important for beautifying the appearance of the violin. Perfect varnishing may protect the wood from wear, damage, moisture, and dirt.
So, the selection and application of the right varnish are vitally important in the violin making process.
Violin makers are using various types of varnish and working methods to varnish the violin.
As a finished violin needs to hang up to age for a time, the varnish is applied in several coats.
A sealer or pore filler can be applied to protect the wood from being dark. Sometimes less-consuming alternatives are used to reduce the cost.
Varnish consists of resins and other natural substances like copal. It can add pigments and dye to get the desired appearance of a violin.
Strings and the bow of the violin

Traditionally “catgut” strings were used in the manufacture of violin strings.
It was crafted from animal intestines. Now gut strings are replaced with modern steel. These modern synthetic versions are more durable than gut strings.
The bow is an important element of a violin. No violin can produce good quality sound without a perfect bow.
The bow is a stick with horsehair. The stick can be made from different types of wood.
Nowadays fiberglass and carbon-fiber are popular choices for making the bow.
But stringing them with horsehair is still unchanged. From the beginning, the horsehair has been used as the stringing of the bow stick.
However, some manufactures are using synthetic fiber as bow-string to increase the durability of the bow.
What type of wood is used to make violins?

The creation of the oldest violin might be a debatable topic.
But most historians agreed that the instrument that we know today as the violin was made in northern Italy in the early 16th century.
Since then, the northern part of Italy is famous for the maple and spruce trees which are very suitable for making the perfect violin. The weather of this region is also playing a vital role to produce the best quality wood for violin.
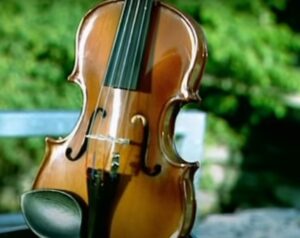
Since the ancient period, wood has been the major component to make a violin. The Violins are made mostly from the wood of spruce and maple trees.
Usually, the wood of the spruce tree is used for the top, and the wood of the maple tree is used for the bottom and ribs while making the violins. Both types of wood are very dense.
So, luthiers can shave it thin as required without compromising its integrity. As these types of wood are very light so it can be easier for the violin player to carry while playing for a long time.
The main body of a violin including the back, neck, and sides is most often made of maple wood. Maple wood also can be used for making the bridge, chin rest, and scroll box.
Quarter-sawn spruce tree wood is suitable for making the top of the violin. The internal part of the violin including the corner, end blocks, and linings is also made of spruce or willow.
But the fingerboard and pegs are made of ebony or any other hardwood. Previously the tailpiece also used to be made of wood. But nowadays it is more common in plastic.
The purfling can be made of many different kinds of wood or cardboard. Some fittings like pegs, tailpiece, chin rest are separately available as a finished or semi-finished form that can be customized or installed by the maker.
The straightness, density, and figure are the main criteria for selecting wood for violins. The tonal characteristics and visual beauty of the finished instrument mainly depend on the selection of this correct wood.
What is the difference between Traditional Violin and Modern Violin
The luthiers have been making violins in this way for years. New designs, materials, and experiments are frequently applied to develop the process of making violins. Recently many synthetic materials like plastic are being used to reduce the cost of violins.
Some modern techniques are applied to make it more affordable for the mass people.
Nowadays electric violin is getting wildly popular to play jazz music. The making process of an electric violin is slightly different.
As electric violin converted the vibrations of the strings to an electrical signal, many high-tech instruments are applied to form these violins.
However, the traditional violin is still popular and dominating the violin market.